 |
| Jug or Bottle Lamp Adapter Kit with Harp & Finial |
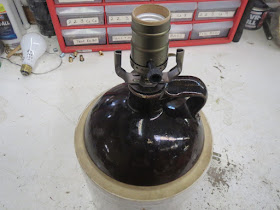
One thing you can't pick up from the lamp parts store is the jug or bottle. Good candidates for lamps are heavy weighted bottles with a large diameter base. These are the most stable for table lamps. This jug was brought to our shop the other day and the customer wanted a table lamp.
With the jug or bottle, we are now going to collect the parts needed.
1. Lamp Socket with side outlet in the socket cap
 |
| Push-Thru Medium Base Lamp Socket with Antique Brass finish and SIDE CORD OUTLET Cap |
 |
| Antiqued Brass Lamp Harps |
 |
| 22364 - 1/8 IP Steel All Thread Nipples |
 |
| Rubber Candlestick and Bottle Adapter, 3 Sizes Available, slips 1/8IP (3/8" diameter) |
Now we will start the 5 step process to assembling the lamp parts and putting the lamp together.
Step 1: Assemble the washer, threaded rod, and nut with the rubber adapter.
The rubber adapter is a crucial part of this lamp. With the harp and lamp shade, there will be a lot of weight supported by this adapter. It should fit really snug in the bottle/jug. For this threaded rod, the parts will make a pattern: nut, lock washer, washer, adapter, washer...
Step 2: Fit the bottle adapter to the bottle top.
Our 1 inch diameter rubber adapter was a bit too snug, so we shaved a little off the sides to make sure we had a good fit.
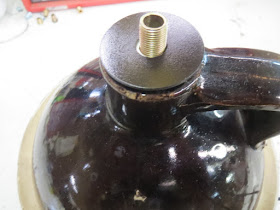
Step 3: Attach the seating ring, rubber washer, harp saddle and socket cap.
The seating ring serves 2 purposes: first, to cover the top of the bottle and look good, second, it acts as a top plate to squeeze the rubber adapter for an even tighter fit. The lock washer goes between the seating ring and the harp saddle.
Note: For this lamp, we orientate the harp saddle from left to right and the side outlet in the socket cap is in the back of the lamp.
Step 4: Wire the socket.
Push the ends of the lamp cord through the side outlet on the socket cap. Tie a UL Knot in the lamp cord. Attach the cord to the socket interior. The smooth wire connects to the brass screw and the ribbed wire connects to the nickle screw. Pull any slack out of the lamp cord back out the socket cap and press the socket shell over the socket interior and lock in the tabs on the socket cap. Make sure there is a tight fit between the socket cap and shell.
Note: The socket turn knob is orientated in the middle of the harp saddle and in the front of the lamp.
Step 5: Add a bulb, plug in the cord and test the lamp.
Give the whole lamp one last look and make sure the socket is locked from cap and shell. Wiggle the socket and make sure the rubber adapter is setting firm in the bottle/jug.
Now you are ready for the harp and shade. Total time < 30 minutes. Total Cost < $30.


