Wednesday, June 8, 2022

Should I Use An A19 or a E26 Bulb on My Vintage Lamp?

Oh the bulb... Without a source of light, the lamp becomes just another dust collecting nick-knack perched on the table top or night stand. With a little filament and electricity, blam-o! We have light. So then the questions is "Should I Use An A19 or a E26 Bulb on My Vintage Lamp?" 

Answer: Why not? 

47260 - LED Vintage Style Light Bulb, A19, Medium Size (E26) w/Loop Filament

The problem is the question. The A19 and E26 are unrelated and describe different aspects of the bulb. The A stands for Arbitrary and the 19 is the measurement in 1/8th of an inch. A19 equals and Arbitrary shape with 19/8th or 2 3/8th (2.375 inches) in diameter. What comes after A? 

Source: https://www.lightopedia.com/static/frontend/images/tools/bulb-shapes-and-sizes.gif

Thanks for the great infographic LightOPedia. And as you can see, there are many different shapes and styles for bulbs, but the A series is the OG. Even Thomas Edison, when asked about the bulb, at one point said "A". 

Notice in this chart, there is no E Series. The E of the "E26" in the light bulb description stands for Edison and the 26 is the measurement in millimeters. E26 equals Edison style (screw type base) with 26 millimeters width (about 1 inch). 


The E26 socket is the most common size lamp socket in North America for table lamps, ceiling fixtures, bathroom lights, hallway lights, and many other applications. Another term for E26 is Medium Socket. E12 sockets are also known as Candelabra Sockets and E39 sockets are known as Mogul Sockets. 

Join us later as we will take a dive into the energy consumption of bulbs. Watt?


Thursday, May 19, 2022

What is a 2 1/4 Inch Fitter and How to Mount a Fixture Shade

Since the dawn of glass lamp shades, glassmiths would create decorative ornate pieces. Perhaps they were commissioned for a specific design or maybe they were making shades for a production of lighting. Either way, one questions remained: fitment. How was this designed shade going to fit on a lamp fixture? 

Pan Light Fixture Drawing

Fortunately some standardized sizes were adopted by the lighting industry and they are still in use today. Traditionally shades were mounted to a fixture with a lipped edge (Figure 2). The shade holder would use a series of set screws (normally 3) to mount the shade to the fixture. 

Lipped Fitter on Glass Shade

For smaller shades, also known as fixture shades, the fitter size is known as a 2 1/4 Inch Fitter. These shades are common in sconces, pendants, pan lights, bathroom fixtures, floor lamps, and many more applications. 

Glass Shade with Fitters
To mount the fixture shade on the lamp, you would need a 2 1/4 inch shade holder, fixture shade, and set screws. Loosen screws so the shade lip can seat in the base of the shade holder, then tighten the screws evenly to firmly hold the shade in place. Pliers or screw drivers are not recommended since they may apply too much pressure on the shade. 


Other standardized lipped fixture shades include: 3 1/4 Inch, 4 Inch, and 6 Inch.  

Friday, April 3, 2020

Halogen Lamp Electronic Dimmable Transformers Explained

Halogen bulbs have been around the market for a while. They offer bright light in compact units. Most halogen lighting is for specialty purposes: track lighting, under cabinet lighting, and security lights. Because they are not in most common applications, they seem to be a little more challenging to trouble shoot.

For this post, we will discuss the dimmable transformers used in halogen lighting. These are mostly found in under-cabinet applications. The transformer is used to convert the 110 Volt alternating current (the power supply to most North American home wiring) to a 12 volt direct current. The 12 volts applications carry fewer amps and allow smaller wires from bulb to bulb. These smaller wires are easier to manage and conceal in tight spaces.

Halogen Lamp Electronic Dimmable Transformer
48468 - Halogen Lamp Electronic Dimmable Transformer

To connect the transformer to the home power supply, connect the black and white wires to the house wires. Most house wires are also black and white. The black wire is the hot and the white wire is the neutral wire. If you are planning to plug this transformer into an outlet and connect it to a cord set (with plug), you will need to connect the black wire to the smooth cord that plugs into the thin blade of the outlet.


From the transformer, there is also a pair of red wires. They will carry the 12 volts to power the halogen bulbs. While the 12 volt DC current has a plus and minus side, the halogen bulbs to not have to tie to a certain side. (NOTE: If you are using this transformer to power 12 volt LED bulbs, you will need to keep the positive and negative sides consistent.) Also, remember the halogen bulbs must be rated for 12 volt circuit.


Most of these applications will have more than one bulb on the transformer, so you will need to keep the circuit organized where the + is on one side and the - is on the other.

Transformer -/+ bulb -/+ bulb -/+ bulb -/+ bulb -/+ bulb

Not: Transformer -/+ bulb -/+ bulb +/- bulb -/+ bulb -/+ bulb

With all the wires in place and transformer connected, you are ready to power the circuit and test the lamps. If you want to add a dimmer, that would be included at the wall switch or inline switch on the 110 volt side of the transformer.


Wednesday, March 18, 2020

How to Use Snap on Plugs and Outlets

Snap on or slide on plugs and outlets are a quick and easy way to add a plug or outlet to a lamp cord. They do not require any wire stripping, and connect the wires within minutes. With a few simple tips, you will be on your way to re-plugging all your lamps.

48514 - Leviton Brand Quick Attachment Plug

48525 - Gilbert Female End Connector

48555B - Brown Slide On Type Polarized Lamp Plug

These types of plugs are offered for SPT-1 or SPT-2 cord types. The first thing you will need to do is identify the type of cord your are trying to plug. Every cord is labeled with the type in small font on the cord itself. You are looking for lettering that appears like this.

Lamp Cord Marking with SPT-1 and SPT-2
Now that you have identified the cord type, select your corresponding plug or outlet style and color. The basic colors offered are black, white, brown, ivory, clear gold, and clear silver. These colors correspond with typical lamp cord colors.

With the cord identified and the corresponding snap plug acquired, you are ready to connect the two together. For the slide on plugs and outlets, remove the back part of the plug:


Notice the piercing blade in the outlet: one for each cord. The piercing blade corresponds to the prong on the plug and the polarity of the plug and wire. On the wire when you identified the SPT size, you will notice one wire is ribbed and the other wire is smooth. The smooth wire is the hot side and should align with the piercing blade for the thin prong on the plug. The end of the wire should be placed in the end of the plug and laid across the piercing blades.

The cap now slides over the plug and applies pressure on the piercing blades.


For snap on plugs, the procedure is similar. First, you will need to separate the interior of the plug from the shell. Spread the prong of the plug all the way apart.

Identify the smooth wire and corresponding piercing blade. These piercing blades are located inside the interior of the plug. Slide the cord in through the plug cap and then into the interior of the plug.


Push the plug prong together and push the interior back into the plug shell. The interior should sit completely back in the shell and be flush in the front.


Now you have it. While there are other types of plugs with screw terminals, the basics are the same: know the type of cord you are working with to make sure it is compatible, identify the smooth or hot wire and connect the hot side to the thin plug prong.

Tuesday, August 27, 2019

Light Care 101: How to Make Light Bulbs Last


By Ann Gapasin

Do you have to change light bulbs frequently?

Are your electric bills unusually high?

You may lack proper light bulb care!

3 Types of Light Bulb for Lamps

You’ve seen stacks of energy-efficient bulbs in hardware stores. If you’re the girl/boy scout type, you probably have some kept in the kitchen drawer in case of an emergency. But do you understand the kind of bulbs that you use? Do you know that there are other options out there?

Incandescent, compact fluorescent light (CFL), and halogen light bulbs are the most basic kinds available on the market these days. This article will walk you through each of them so you can make an informed decision as to which is the best bulb for you.

Incandescent Bulbs

This is the most traditional type, and almost all of us are familiar with it. Incandescent bulbs produce a warm glow that is ideal for creating a cozy mood or when highlighting color in a room. However, it is the least efficient and will have to be replaced more often than others.

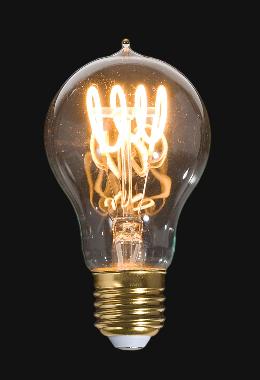
Incandescent A19 Bulb


The high-temperature tungsten filament produces visible light with infrared waves.

Only 3% to 8% of the energy that they consume is transformed into visible light. The rest becomes heat.

       The average lifespan is only approximately 1,000 hours.
       Imposes challenges when it comes to recycling
       May cause eye strain
       Generally fragile: sensitive to voltage and temperature fluctuations and presence of water.

CFL (Compact Fluorescent Light) Bulbs

CFLs are today’s superstar when it comes to lamp bulbs. They are the most energy-efficient and can be found in different shapes. These bulbs use much less electricity than incandescent and even last much longer. However, they incline to emanate cold light, similar to halogens. This makes CFLs more appropriate in shaded areas. Furthermore, they contain mercury, which means they must be handled with extreme caution.

Compact Fluorescent Bulb (CFL) Spiral Top

        Electrons triggered by mercury vapor releases UV.
        15% to 20% of energy is converted into visible light.
        CFLs tend to last at least ten times longer than incandescent.
        There is a possibility of mercury vapor leak, so special handling is required during disposal and recycling.
        CFLs are also vulnerable to voltage fluctuations
        You must wait for several minutes for its output to the peak.

Light Emitting Diodes (LED)

These deviate from the traditional way on how light bulbs work. LED does not have a filament. Instead, they pass current across a semiconductor to produce light. Because they do not have filaments that will slowly burn out, they require less replacement.

Edison Style Filament LED A19 Bulb


LEDs are considerably more efficient than incandescent and CFLs because their waste thermal radiation is much lower. Earlier varieties were criticized for taking too long to reach the peak output. But this aspect has been improved and newer types light up immediately.

        LEDs are electroluminescent.
        They convert 90% to 99% of energy into visible light.
        They can last for up to 60,000 hours or more.
        This type of light bulb is easier to recycle.
        Their robust structure allows them to withstand harsh conditions.

How to Take Care of Lamp Bulbs

Learning how to take care of your lamps not only prevents frequent trips to the hardware store, it is also an effective way to avoid unnecessary inconvenience and safety hazards.

Don’t Touch the Light Bulb While It Is Still Hot

Light bulbs produce heat. And the longer you leave them on, the hotter they become. Heat causes the metallic filament within the bulbs to become brittle. According to Sunrise Electrician, a trusted Tampa electrician, you are subjecting the thread to more vibrations when you move the lamp while it is still hot. A combination of heat and vibration will surely trim a hundred hours or so from your light bulb’s lifespan.

This precaution should also be applied during installation. A bulb installed in a mobile place will also become mobile.  This means that those bulbs installed in hanging pendants tend to have a shorter lifespan. Same goes with the lamp inside your fridge: it shakes every time you slam the door. For this kind of application, make sure to use bulbs with reinforced filaments.

Limit the Use of the On Button

If you’re leaving the room for only a brief period, it might be wiser just to leave the lights on. This is because every single time that you turn the switch on, you are subjecting the light bulbs to a blast of power. It takes faster than a blink of an eye for the current to reach the filament.

What does this mean? It means the filament’s temperature will rise from a cozy 70°F to 3000 70°F in less than a second. If you flip the switch too often, the filament will break in no time. One of the common symptoms of a filament problem is flickering lights.

But it is essential to know that flickering lights can also be caused by a more severe problem. The most common is an overloaded circuit. Electricians advise to call them during light bulb replacement so that they can check if there are other issues within your electrical system.

Let the Light Bulbs Run at Low Power

Running on low power is another secret of long-life incandescent bulbs. Power equates to heat, which means less power is less heat. And less heat is equivalent to less stress on your light bulb filament.

Common houses in the country run on 110. So if you use a bulb with a 130V rating, it will operate using a power that is 15% less than it is capable of handling.  You may also take advantage of dimmer switches. These devices lower the voltage that comes to the bulb, reducing their burden.


Keep in mind that the primary purpose of light bulb care is to save on resources. That being said: do you think it is more practical to extend the life of incandescent bulbs of your brass lamps by dimming and avoiding the switch button? Or is it time to move to more energy-efficient products?  Take to a licensed electrician on how to make your home safer and friendlier to the environment.

This article was written by Ann Gapasin. Thank you, Ann, for your contribution to this blog.

Friday, June 14, 2019

Touch Sensitive Lamp Switch

The good ole touch sensitive lamp is a really unique idea. The sensor turns the whole lamp into a switch. No need to clumsily fumble around with the cord or the side of the socket to look for that menacing switch. Que the infomercial clumsy reel.


I digress. The idea is really more scientific. According to Wikipedia "They act on the principle of body capacitance." And body capacitance?

Body capacitance is the physical property of the human body that has it act as a capacitor. Like any other electrically-conductive object, a human body can store electric charge if insulated.

Finally, my superpower is revealed! I can turn on a lamp with the touch of my finger. Now that is cool.

The uncool part is these switches have a tendency to stop working. Instead of sending the lamp to a landfill, simply replace the touch sensitive switch.


Now you are two superheros: Thor and Captain Planet.


Monday, May 20, 2019

Cracked Black Plastic Sockets Are An Easy Fix

Many lamps today are made with inexpensive components. Specifically, I mean the black plastic sockets used in most household table lamps. These sockets are brittle and easily chipped and cracked. If you are like me and often shop in the closeout section or the "imperfect" type of store, you will easily find these sockets cracked, chipped, and often missing on the lamps for sale. The good news is they are really easy to fix.


As this video demonstrates, there are 3 parts of the plastic socket: cap (bottom), shell (top), and the socket interior. The shell screws on to the cap and can be replaced in a few minutes.


Don't let those cracked, chipped or bent lamp parts keep you from getting the lamp you like.